It's race day! I'm off to Oktoberfest to complete my 4th half marathon this year. (4 more to go as of this writing.) Maybe someday I'll bite the bullet and train for a full. Just toying with the slight thought of how to muster the bravery. Maybe I should wait til my kiddos aren't so little anymore?
Anyhow, my Moms RUN This Town group got together to make the largest team, and therefore qualify for VIP status. I'm looking forward to that! Some of us are even dressing up for the occasion.
This is a tech shirt I found for under $3 at the thrift store, and this is what I did to it:
And, I couldn't just leave the back blank, so here is the back:
But enough dawdling... I better get ready. I'm lucky enough to have a few friends who will stay with me since I am under trained for this event. Well, they aren't staying with me peper say, they are helping me to help Andie cross the finish line. Her health has declined in such a way that I'll be pushing her in a wheelchair for her first 13.1 mile race, with the help of some fantastic team mates when I get tired.
Wish us luck! More later. Off for a big adventure!!!!
The race takes place in the evening on the streets of Portland, OR. We run the "Starlight Parade" route just before the actual parade begins.
It's a fun and zany parade with some of the Portland Rose Festival floats altered to light up for the night time parade. The Starlight Run is like the opening act for a big concert... the run is no small fare with over 7,000 registered runners and completely zaney as well.
The Starlight Run is an untimed event... the clock ticking though for runners to finish before the start of the parade. Most runners run in some form of costume, whether it be a tutu or fun shirt or some other crazy design. Those hoping to participate in the costume contest need to report to the band stage (at the start expo/party) at 6:30pm and the race starts at 7:45pm. (The Parade afterwards starts at about 9pm.)
Race registration is $19.00 for 16 years and up with a free meal ticket on each bib for The Old Spaghetti Factory (up to $10.50 in value). The race beneficiary is Legacy Health Rehabilitation and Therapy Program when participants make a donation during their registration process.
The Rose Festival's theme this year is "Making Memories" and dressing up as the characters from the movie "Up" seemed like a perfect match for the race and festival's theme.
I can't remember whose idea it was... but I was very honored to be invited to be in the gang! I took on the task of becoming "Carl" and true to my fashion, started scouring the thrift stores for clothes and items to reuse.
Carl's head is made from a styrofoam cooler and other styrofoam pieces from the recycle bin.
After locating some overly warm pants at the thrift store and a brown flannel shirt for a suit jacket, I stole borrowed a white dress shirt from my husband and completed the look with a homemade "Ellie Badge" and bowtie. Sandy is a very talented woman who designed and completed the "Dug" (dog), "Kevin" (bird) and "Russell" (wilderness explorer scout) costumes. Check out the detail on "Russell's" backpack:
complete with candybar with a beak shaped bite.
And here is my costume after some paint over the styrofoam and some felt glued on for hair.
However, my completed costume is not complete without the group...
So here is my amazing group at the beginning of the race. Check out the detail on that house! Complete with a garden hose near the front door and details like sky printed tights. Way to go Mel!
Despite the warm weather and the bulky get up, I would do it all over again in a heart beat. It was so fun to see all the different types of costumes and themes. My favorite with the "making memories" theme was a couple who were dressed as an actual photo album. Very creative!
We didn't win the costume contest, but enjoyed mingling with the other runners and being asked about 200 times to stop and pose with people to have our picture taken with them. Clif Bar got a few pictures with us. I felt like a movie star.... okay, I was dressed up as a movie character.
There are an estimated 150,000 spectators for the parade and we ran in front of them. News stations and parade announcers announced in their microphones for the spectators that the characters from the movie Up were approaching. Kids screamed for our high fives and adults screamed "SQUIRREL!" for our hyper dog to get excited over. It was so much fun. Waluigi stole my cane mid race and when Mario was unable to peg him with a turtle shell, my faithful dog, Dug, ran ahead and retrieved it.
Before long, I saw the mile 3 mile marker and shouted through my head gear "I have never been so happy to see a mile 3 marker!" to the laughter of my team mates.
We all stayed together and finished together hand in hand. I hope we can do this all together again next year!!
From left to right is me as "Carl", Sandy as "Kevin", Mel as "the House", Rod as "Russell" and Maryalicia as "Dug". (You can follow some of Maryalicia's adventures on the Run Oregon blog, Sandy at Runsilly.com and Mel at CostumesOnTheRun.Blogspot.com.)
A little extra about race day preparation:
With the costume done and a day to spare, I needed something more to do. I'm a last minute person... so to keep my hands busy and to drive myself crazy with a big project with a deadline, I decided to make more "Ellie Badges" ...
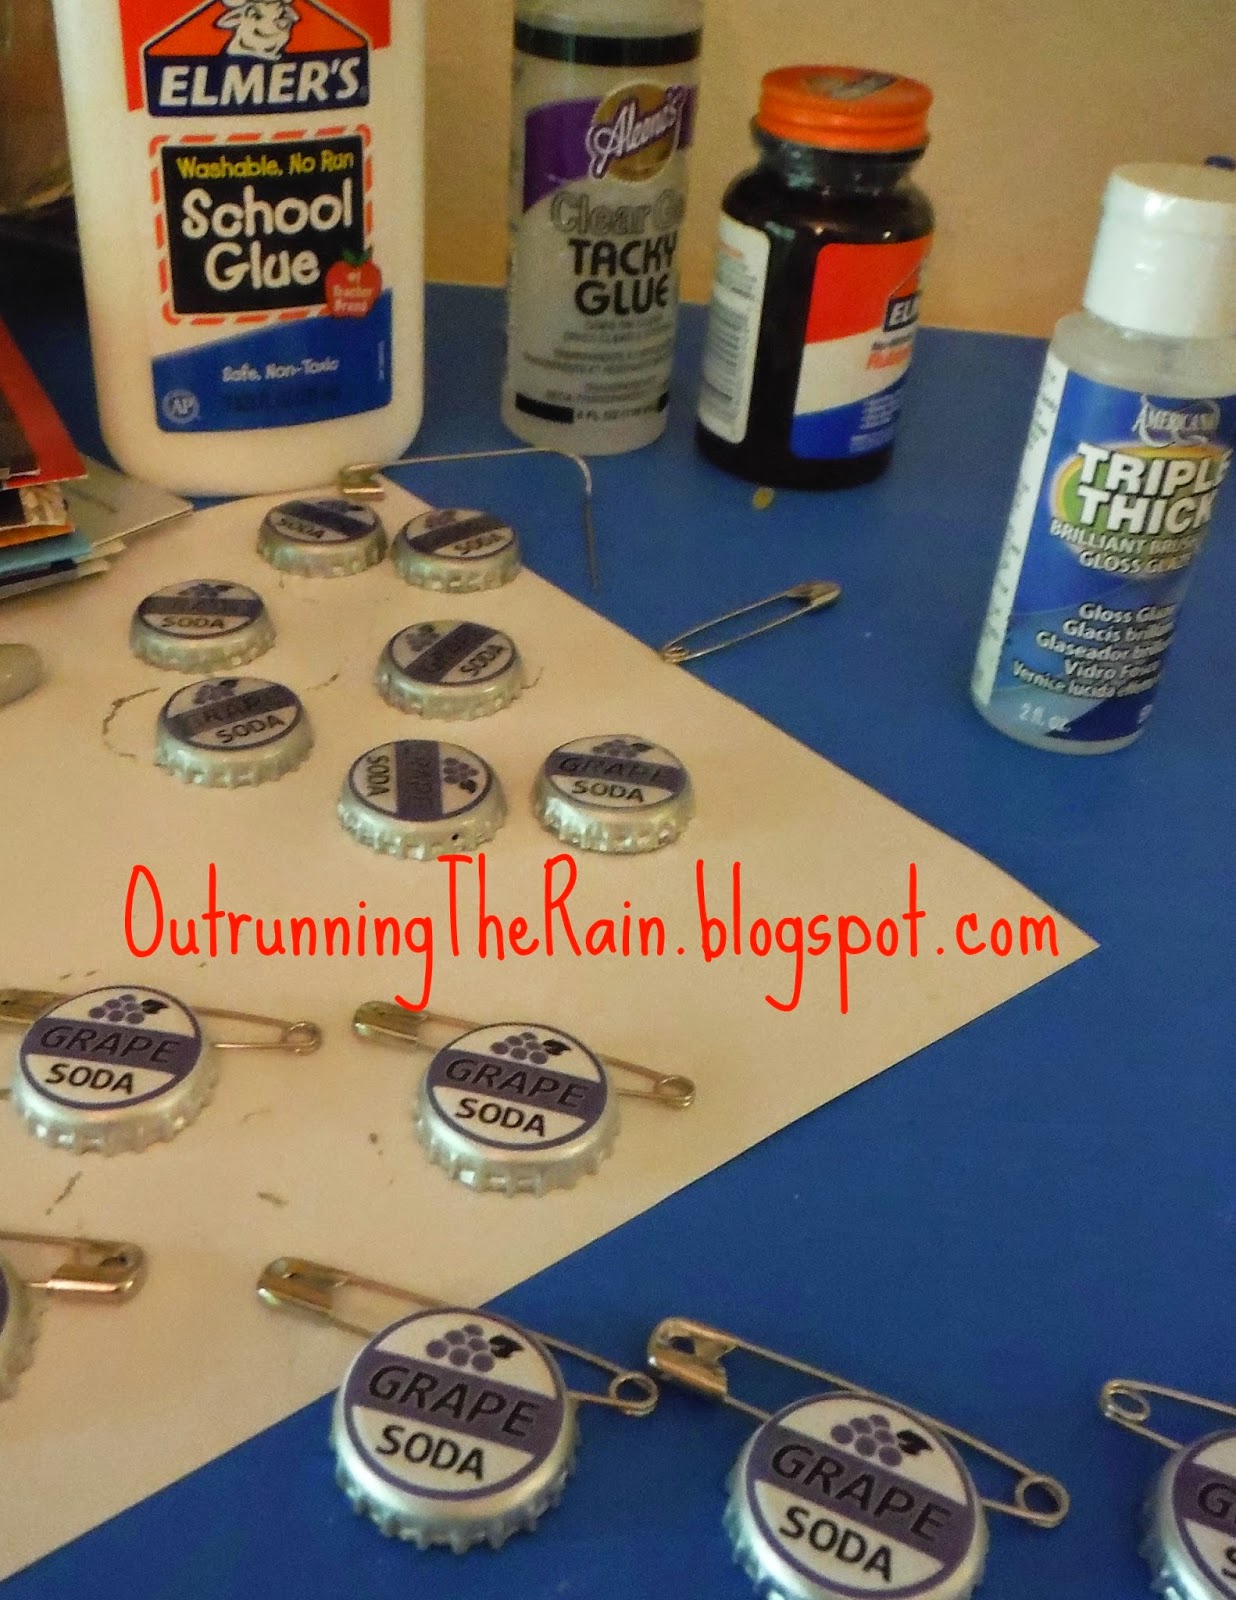
I made about 15 of them to pass out to my friends and a few extras for some of our biggest fans. I think after my friends each go one, I had about three left. I gave them to the parents of some of the youngest kiddos and they were all so thrilled. Click here for the web page with the best directions and pdf file for the logo. An extra step that is very helpful is removing the safety pin clasp/head to place the bottle cap on. By doing that (with the clasp/head secured again) the bottle cap is secured to the pin and not going anywhere when the pin is opened. That, and, that's how it is in the movie.
Finally, this was a race with no bling and as a bling whore... I couldn't have that. So I got on the net, looked up a Rose Festival logo and changed it to say "Starlight Run 5k" "Making Memories" and "2014".
I sewed a ribbon into a loop and laced each "ellie badge" on to the ribbon. The "grape soda" logo was glued inside with a high gloss coating applied to both sides.
I regret not making some for the two husbands who stayed with our group on the run. They were vital and just as much part of the group despite not having costumes. My huge head was not very race friendly and it was impossible to see or hear. Often a small child would dart out in front of me and I wouldn't know it... potentially tripping over them and taking us both out! The two guys quickly became my "spotters" checking on me (as it was a hot day made worse my physical exertion under many layers of clothes and a styrofoam head) and helping to direct me so that I didn't trip over anyone and hurt them or myself. At one point my shoe actually came untied! I have never had a shoe come untied during a race... and it had to be this one. I didn't realize it and when a team mate pointed it out, one of the guys came to the rescue and tied it for me. I actually couldn't see my feet and it was pretty cumbersome to get my head on and off. So big thanks to Tim and Brian who helped keep the group together and safe and without incident!
And if you have no idea what the movie "Up" is, here is a short clip from the beginning of the move. "Up" just celebrated it's 5 year anniversary of being released in theaters.
This is the best four minutes of Pixar's cinema history... Life, love, struggles, happiness every emotion wrapped up in this little clip. The whole movie itself is a fun and heartwarming piece of art. At least I think so...
The only time I had run with someone for an entire race was a couple weeks ago at the Hippie Chicks Half. It was so much fun to run with such a large group of people!
Have you ever ran with a large group of people from start to finish? Ran a parade route? Ran in a crazy costume? Tell me about your experiences!
Well, the greater Portland, Or area (along with Vancouver, Wa) has an advisory to stay out of the streets and stay indoors. I was hoping to get a long run in today... but I watched my husband slip and slide down the sidewalk as he went to check on our elderly neighbors. I think I'll stay in my warm and safe house (that still has power) and cook. :)
I'm not an egg fan, but I gave it a try and these are delicious! Give it a try and tell me what variations you try! These are very versatile and can have many different options...
You will need:
3 eggs
1 tablespoon of pumpkin puree
1 tablespoon of almond meal/flour
1 tablespoon of Gluten Free oats
Combine all ingredients except for the oats in blender, blend until smooth. Stir in oats. I also added a splash of vanilla extract and some cinnamon.
Pour into hot skillet like you would for regular pancakes and GENTLY flip and cook other side.
Once cooked, I drizzled mine in cinnamon and honey and ate like a pancake.
An absolute delicious way to eat eggs! (Next time I'll try a little butter and lemon juice...)
Since we are stuck indoors with the slick ice... I guess today will be cross training on the exercise bike and a bit more cooking. :) I'm also going to whip up some of my "Running cookies" and you should be able to pull up the past post with the recipe HERE.
Chia seeds, oats, pumpkin protein powder, coconut flakes, cocoa powder and salt.
Pretty, isn't it? They are super yummy too, and I hide them in the back of the fridge so that I only enjoy them while on a long run or one post run.
I did get to go out and enjoy some of the snow this week before it turned to ice. We get small dustings of snow once every year or every other year... but nothing I'd really define as "snow". This year, we got 8 inches! Last time it really "snowed" (as I define it, with at least one inch accumulated) was 6 years ago! I wasn't a runner then... So I did not hesitate to go out there and play in it!
First snow run ever!
Thursday was our first day of snow and we had a couple inches... I went out for what i told my husband would be a "quick half mile" and snuck in another mile on that. It was glorious! No one else had been out and no one was driving in it yet. There was just me and the sound of my feet crunching the new snow. It was soft and fun to feel the padded ground beneath my shoes.
Friday was a longer run and a lot more slow and slick.
Friday's run had me completely lost at 3.5 miles.
I have been using the Nike+ app to help me keep track of which shoes have how many miles on them... and I earned my "Storm" badge. Fun little app with badges to help motivate you or competitions you can challenge other friends on the app with. Anyway...
An hour and a half in the snow, I got lost, misjudged where the curb started and ended at least twice (but didn't fall!) and trudged through a field of snow that was knee deep. The duct tape over my shoes kept my feet dry and it was beautiful and fun to be out there... but as I neared my regular stomping grounds and was at the "one mile" landmark from home, I saw a car accident with police and an ambulance on the way.
Time to high tail it home.
As I got home, I checked the mail and got my valentines' gift for Squeakers and Bugaboo...
I decided to get them the "Love" badge with the heart on it... available for "a limited time" with RoadID. You can get yours here: http://RoadID.com/invite/45WZT-TAF7SCZZXBJ (or send me a private message on my facebook page if you'd like a $1 off coupon).
I'd say it has been a "running focused" weekend of running, even if I didn't get my long run in!
And with that, here's the tune I always get stuck in my head when I think of snow...
Do you run in snow? Own a treadmill or take the winter off? Share your secrets!
Logo by: Andrea Schwoebel (http://andreaschwoebel.com)
A friend from Moms RUN This Town posted on Facebook about a free 5k, and before she could say anything else about it.... she had me at "free".
Cost: The race is free, but asking for donations for the Ladybug CDH Foundation. Participants could bring 100% cotton receiving blankets, socks or hats. If it was easier, cutting a check for the foundation was acceptable (and appreciated) too!
The race was a small and intimate affair, but so much fun and highly recommended!! I am bad at estimates, but I think there may have been about 50 people participating today.
Beneficiary: As noted above, the Ladybug CDH Foundation was receiving the donations made by participants. Click on their name to go see their webpage what they are all about! They hope to raise awareness about a birth defect called Congenital Diaphragmatic Hernia and raise money for research and treatment.
$110 was raised in cash/checks and the charity received 83 pairs of socks, 42 hats and 64 receiving blankets! I don't know how that compares to last year, but I hope the race is growing and will continue to grow in participants.
Location: The 5k (or one mile option) was an untimed fun run that was held at Summerlake Park. The park was very beautiful with the light fog, frozen lakes and streams and water fowl in the area. There is also a dog park with in the park and a very dog-friendly race for friendly dogs.
The course is pretty flat, with a mild incline at the end of the first mile (or just after starting your second loop of the park).
Atmosphere: The events started with a costume contest before the actually running or walking... What would an "Ugly Holiday Sweater" theme race be without costumes?
As you can see below, I went all out in my "Ugly Sweater". I didn't just put on a sweater I found and decorated... I dressed up as a sweater!
Once again, I forgot to ask people for permission to post their pics on my blog, so you'll have to trust me that there were some really fantastic, fun and festive holiday sweaters there. One of the participants wore a "top hat" that was a brick design with black boots on the top like Santa's feet on his way down the chimney. Then the sweater was green and done up like a tree.
Eggnog was donated by Alpenrose, coffee from Starbucks, bagels from Einstein Bagels and some pastries and holiday cookies that I believe were from a local grocery store.
There was also plenty of door prizes too. And to get a door prize? All you had to do was show up, receive your drawing ticket and hold on to half of it while the other half was placed into the basket for the drawing.
While runners and walkers made their journey to finish one loop or three, the race organizers taped the winning ticket to the items and you could check to see if you had a match.
A fresh cut holiday wreath was available, 13 gift certificates to Veggie grill, gift cards to local running stores (Foot Traffic and Pace Setter Athletic), and a free race entry to a local race (The Bald Peak Half).
(Pretty awesome! My family scored two $10 veggie grill cards and my running partner/sole sister got $20 to the local "candy store"... okay, running store.)
In the top right picture, you can see the "bones' of the costume. My husband constructed a large pvc pipe "hanger to hold the XL sweater coat and with some foam, a belt and suspenders, the contraption somehow stayed on and relatively pain-free.
The next two photos on the right column are me in the first test run.
The bottom, middle picture is my Squeakers and Bugaboo after the race, and heading home. Squeakers is wearing wool pants made out of a shrunken, felted (and ugly) sweater.
The bottom left picture is my "bling" for my creative masterpiece. :) A trophy that has to be more than 3 ft tall.... though I haven't broken out the tape measure for it.
Bibs were also available for fun at the race, as well as a link provided before hand to print out. I just love the logo of the runner in the detailed sweater she has on.
Race bib by: Andrea Schwoebel (http://andreaschwoebel.com)
So, I hope I've convinced you to give this one a try next year. If anything, it's untimed, so grab a group of your friends and wrap yourselves up in yarn and Christmas lights ( you could call your team "hot mess") and have some fun while helping out some babies.
You can't go wrong and will be glad you went.
(Don't expect me to outdo myself on this year's costume. I'll probably be wearing it until it starts to unravel. And now I have Weezer "Undone" stuck in my head.)
Eight days before my "Turkey Trot" race on Thanksgiving Morning... I got onto Google. This is usually bad news for me, because I see some idea that I can't let go of and become obsessed.
This time, I looked up "Turkey Trot Costumes" and scrolling through the images, it didn't take long to come across this beauty:
The website says it was the Turkey Trot from 2011 in Detroit... So, getting more specific in my Google search terms, I found a youtube video with the runner in action (which you can click here to see it, but you might want to fast forward to 4:25.) and a blog about his costume!
After my detective work was done, I set to sketching and after two hours from the initial Google search, I had the head completed.
Because I was in such a hurry, I didn't think this through in terms of blogging and didn't take many photos of the process to make this. So, bare with me as I try to explain it...
I've made 90% of the costume with found objects in my random home. I have lots of felt for all sorts of projects, so using some felt, some orange-ish 4-way stretch jersey material, a pool noodle, black pants, coat hangers and a pole I use in the garden for bean runners... I have my costume. And a whole lot of pillow stuffing. Some I had to pilfer from friends who had some old/extra pillows I could de fluff.
First thing, my orange material was "tube shaped" like the material was meant to be sewn into a skirt. So, I took the "waist" of the skirt-like tube and folded it down to the bottom and sewed the two together all the way around, except for a small hole to shove pillow stuffing and the pool noodle in.
Next I cut an "x" in the crotch of some old black pants and sew the new opening around the doughnut-hole opening in the orange material. This "x" has to be big enough to fit around the hole in the orange doughnut and big enough for me to jimmy on before a race. :)
Getting into this thing is a making for a bad video on youtube or something.
Then next part, I had my husband place a tennis ball on the end of the "bean pole" so that if/when I tripped and fell over my costume, I wouldn't impale myself on the rod in the head. Shove it in the turkey head, add stuffing and sew the neck shut and attach the pole through the "chest" of the orange doughnut and secure pole into the pool noodle with just about anything you can get to work... We have a lot of hot glue, string and maybe even a little duct tape in the mix. The tail is attached the same way, with some coat hangers within a couple of the feathers so that it didn't just flop down behind me and get dragged behind me on race day. It did droop a little and I'll want to fix that somehow so I'm not irritating the serious racers around me when i run in it.
That's pretty much it. Oh! Except suspenders. Suspenders are a must. That is what I did purchase for the costume at the local thrift shop. Attaching the suspenders to the orange doughnut, I had to be cautious stepping into the doughnut hole... not to get tangled in the suspender straps and hike the turkey butt up over my own. That was a chore. Most certainly something I needed help with.
I have very patient friends...
This is me taking the turkey out for a test spin. It did great for those 2 test miles.
The reactions I got from witnesses of my test run would be a whole other blog entry...
On race day, I'd change how to get the tail to be a little more predictable and not so droopy and after 3 1/2 miles in it, my suspenders came loose. I pestered two poor race volunteers at separate parts of the course to reach down into the "doughnut hole" and clip my suspenders.
I swear that isn't as naughty as it sounds.
After giving up on it working again, I carried the turkey to the end/beginning of the race where I had one more loop to do. I'll go into all of that when i get the race recap up... but for now, I think instead of suspenders that are removable with their clips... I'd sew in something much more permanent and no chance of snapping/breaking/coming undone.
Anyway. I added some old back socks to the end of the pants for "boots" (with some white material from the old pillow for the "socks"), hot glued some painted cardboard on for buckles and used a black tech shirt and some white material for the pilgrim's shirt.
The hat is black poster board and a little bit of foam inside. I hot glued a headband to it and it stayed on perfectly. That's about all I can think of... :) I'll get the recap up soon and post a pic of it on race day. I added a couple embellishments with jingle bells on the reins and black arm sleeves with white cuffs on my arms.
Did you do a "Turkey Trot"? Do you ever run in costume? DIY or store bought modified for running?
**I should add that this beast weighed 11lbs, so I'll probably want to figure out ways to lighten it up too**
I think Bugaboo could eat me out of house and home with her ferocity for Lara bars or Picky Bars and the cost to keep them in the house in ready supply. So... why buy them (or any bar that hefts a heavy price) and why not make your own for a fraction of the cost? Also, getting to control the ingredients and make fuel organic is a big bonus for me. (Especially if I'm going to share them with my little running partners.)
Bugaboo has named them "Running Cookies" because she only gets one when we are out on a run together.
1/4 Cup cocoa powder (instant coffee might be a good substitute.)
10 ounces Medjool dates (without pits)
1/4 Cup dried fruit (such as cranberries or cherries... whatever you enjoy)
1 Tablespoons coarse salt (or more. 2T will taste salty, but I use that much because I sweat a lot... If you don't sweat much or don't want to taste salt, try just 1T.)
1/2 Cup Peanut butter (I prefer crunchy, but creamy is fine.)
1/3 Cup Honey
1 Teaspoon Vanilla
If your food processor won't be temperamental with you, throw the pit-free dates in and coarsely chop them up. My ancient machine prefers I do that first before adding them into the mix.
Mix dry ingredients with the dates and pulse together in food processor. Then add in wet ingredients (p.b., honey and vanilla.) and mix together.
The mixture should be like a thick cookie dough. (If it's too dry, the bars will fall apart on your run and you'll have a baggie full of crumbs. If it's too wet, you'll have a gooey mess and be sucking the "fuel" off your fingers. Eww.
Press the mixture into an 8x8 glass baking dish and refrigerate overnight. I like to score the pressed mixture so that it's easier to cut the cold dough and pry out the bars for the next morning's run.
After they have refrigerated, store in air tight container in refrigerator. I don't know how long you'd want to keep them around, but I usually eat mine up in about 2 weeks, depending on the miles covered in each week. I like to eat one pre run and then again every 3 miles or every 30-40 minutes... which ever happens first, I suppose.)
It's a forgiving recipe that can have substitutions and lots of combinations, but this is the ratios that have worked for me and been easily transportable on a half marathon. I put the bars in a zip lock baggie and carry them in my flip belt.
Mixture pressed into an 8x8 pan before being placed in the fridge.
I hope you enjoy them!
Do you make your own fuel/running food? I'd love to hear your recipes!
In a couple hours, I knocked this out and found it pretty easy and cost efficient. There are some really beautiful, but pretty expensive race bib holders and medal displays... So I decided to make my own.
This is how I did it:
Supplies and relative cost
Supplies needed:
Wood for the medals and bibs to be on display. I got a 11x12 inch MDF scrap of wood for $0.51 at Home Depot (in the scrap lumber section) as well as a long plank of wood (2X4?) for the medals and cut it down to about 18 inches long.
Knobs for the medals to be hung from on the plank of wood. If you have the patience, you can find some fantastic vintage and rustic distressed knobs that aren't matchy-matchy at places like the Habitat for Humanity Restore. Otherwise, you can get basic wooden ones at the hardware store for about a dollar each. If you're really lucky, the previous homeowner left all sorts of goodies like this in your garage when you moved in.
Picture hanger hooks to nail on the back of each display so you can easily hang it on the wall. This was $2.97 at my Home Depot.
Cup Hooks or the like to hang race bibs on. Another option would be to line the bottom of the race bib display with the cup hooks to hang medals from there too. Cost $3.48.
Acrylic paint to paint the endges of the wood. Unless you are talented at folding the scrapbook paper over the edges and make it look clean and nice. Paint might want to be a complentary color to the scrapbook paper colors.
Scrap book paper. This will be mod-podged on the wood surface. You could also just paint it or leave it with wood grain. This would be especially nice with a rustic piece of distressed drift wood or old wood from a weathered barn. You could also use an old map instead of scrap book paper. The options are endless. Request samples of wall paper from a designer store and collage that on there? Whatever you heart is content with.
A "paper friendly glue" to put on your background paper. Mod Podge is generally the go-to glue for this, but I actually had issues with my paper wrinkling. This is probably because my mod podge had been sitting in the craft closet for ages and settled a bit. I ended up using rubber cement and it's working great.
Exacto knife
Ruler
Drill
I think that covers the basic supplies. I did need a drill, so a drill would be good and a stencil for my mantra... but hopefully this DIY will make sense and not be too difficult to follow with more and more supplies being added on.
For the medal display, the first thing I did was layout my knobs and evenly space them apart. After marking where I wanted them, I had my husband drill a hole for the screw to be placed in the plank of wood and into the knob. He drilled the base of the hole larger than needed so that the head of the screw would be recessed into the wood and the wood could sit flush against the wall.
I then painted the knobs and set them aside to dry and then coated them with a coat of mod podge so that they'd have a slight gloss and be a little protected from knicks and scratches on my craft paint coat.
While that's all drying, lay the plank of wood over the scrapbook paper and trace out a section of your plank of wood. If your paper has a specific design (like mine), you'll want to cut out that rectangle and glue it on the paper again so that the designs match up and that the paper is long enough to cover your plank of wood.
I glued on my paper onto the wood and stacked lots and lots of heavy books onto it and left it to dry. (While it's drying you can go work on the bib display.)
After it's dry, I cut off the edges of the paper hanging over the edges of the wood with an exacto knife. Then nail on the picture hanging hooks on each corner.
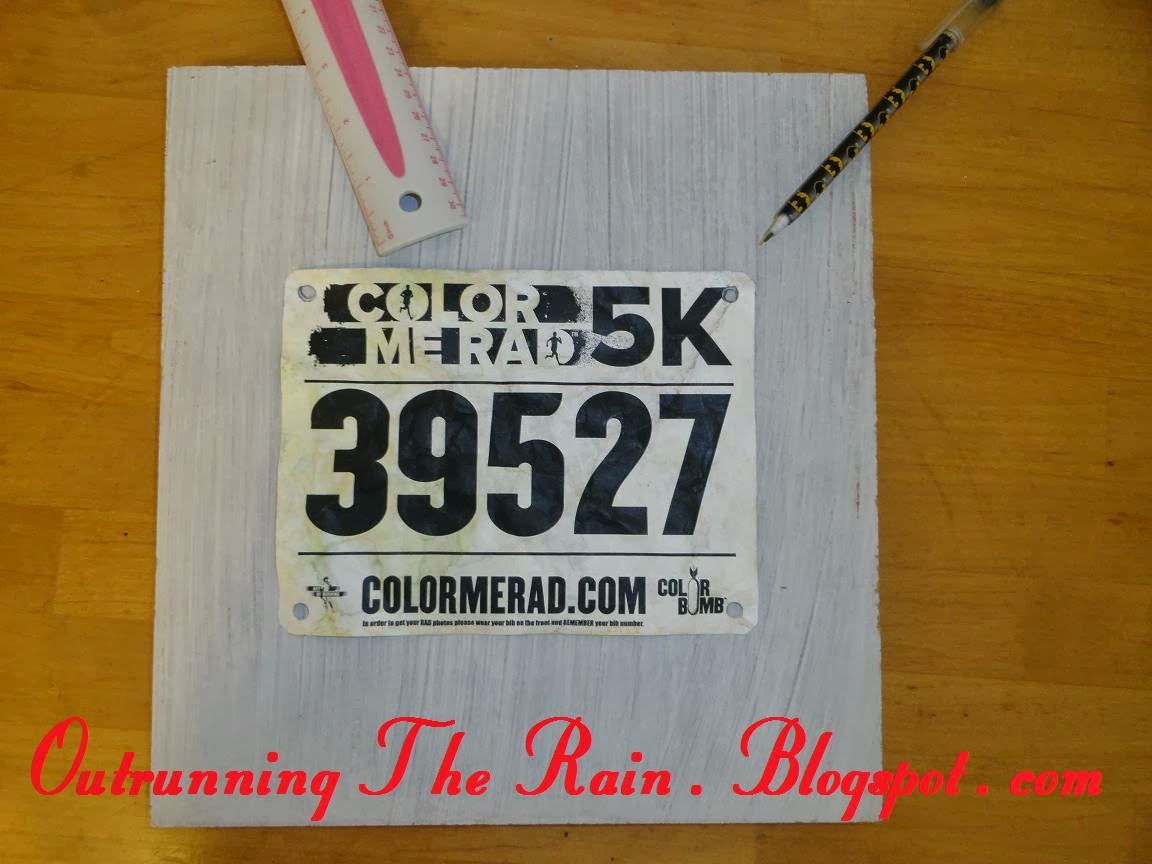
For the bib display, I had two sizes of bibs. The standard size for races like "Color Me Rad" or the huge ones like my "Run Like Hell" bib. I laid each size down and marked where the upper holes on the bib were.
The smaller bib will be places a little bit higher and the larger bib a little bit lower.
The larger bib is placed below the smaller ones and placed a little bit lower to make flipping through the bibs a bit easier. I suppose you could just punch new holes into any funky shaped bibs, but I can't bare the thought!
You can also run an iron on nylon setting over your really wrinkled bibs, but beware that resting the iron for the briefest of moments may result in a brown spot on your bib.
Before displaying your bibs, you'll also want to tear away the "Do Not Tear" foam bits for your timing chips.
Anyway, after marking the bib places on the board, whip out the drill and put some holes in your board. Your cup hooks might be the kind you can drill in by hand, but save your hand some work.... especially if you have MDF.
Place the hooks in and make sure your bibs hang the way you wanted.... or that you didn't mis-measure something.
Then I removed the hooks, measured where the holes were on my board and marked the "top" on the back of my board. Glue on the scrapbook paper, pile books on and wait to dry. This could be where you iron or rip timing chips off your bibs.
When the glue is dry, cut excess paper off with the exacto knife and stencil on a mantra if you desire.
I stenciled first on scratch paper so I could get an idea of which details on letters might shift and which letters needed to be adjusted for height.
I then traced my stencils (purchased for $0.10 at Scrap PDX) and painted my letters on.
Bugaboo used my extra paint to paint some letters of her own.
After it's done, you can coat with a layer of mod podge and replace hooks and display!
I placed bibs on some rings left over from my college flashcard days, but decided to just leave the bibs on the hook.
I might replace these small hooks with larger hooks or just split the growing pile of small bibs for each flash card ring and hang each ring on the hook. We'll see.
So, easy enough? I really hope I explained that well enough to understand.